Category: Automotive DIY guides & tool reviews

  • Reading OBD-II codes without a shop

    How to Read OBD-II Codes Without Visiting a Garage

    It was 7:22 AM on a drizzly Tuesday in Staffordshire when our project car’s dashboard lit up like a Christmas tree. The dreaded amber glow of the check engine light is a universal symbol of financial dread, but on a wet British morning with the school run looming, the panic feels uniquely acute. For years, that light meant a frantic call to the local garage and a sinking feeling anticipating a four-figure repair bill. We decided enough was enough. We set out to demystify onboard diagnostics, and what we discovered was empowering: you don’t need a computer science degree or a £5,000 Snap-on scanner to talk to your car. You just need guidance and a small piece of hardware.

    Why We Bypass the Garage for Initial Diagnostics

    Walking into a repair centre with a glowing engine light is like handing a blank cheque to a stranger. By scanning on the driveway first, we retain control. It lets us distinguish between a minor hiccup—like a loose petrol cap—and something serious, such as early bad fuel injector symptoms. Understanding the fault’s severity before picking up the phone stops us from being swayed into unnecessary repairs. We also avoid the diagnostic fees charged by chains like Kwik Fit or Halfords, which typically range from £50 to £80. Investing that money in our own equipment means we can diagnose multiple vehicles over the years and confidently phone a mobile mechanic for a targeted fix.

    We stick to driveway diagnostics for three key reasons:

    • Cost control: We skip the £50–£80 initial scan fee and invest it in our own reusable hardware.
    • Informed decisions: Armed with a code, we can phone a trusted independent garage for a precise quote rather than accepting a vague “we’ll have a look” estimate.
    • Idle curiosity turned empowerment: Learning what a P0420 or U0100 actually means transforms panic into a manageable to-do list.

    The Essential Hardware: Standalone Scanners We Trust

    The barrier to entry for DIY diagnostics is surprisingly low. Even a budget device costing around £20 can read the generic powertrain codes that trigger the check engine light. For older vehicles, a standalone handheld scanner like the Topdon AL300 is our go-to. It boots instantly, reads codes, and erases them without smartphone connectivity headaches. For modern cars, we reach for a Bluetooth dongle based on the ELM327 standard. These small devices plug into the OBD-II port under the steering wheel and transmit data wirelessly to our phones. The beauty of the ELM327 chipset is its universality, though we caution against cheap clones that struggle with modern CAN bus systems.

    Our Smartphone Setup: The Best UK Apps for Auto Repair

    Hardware is only half the story. Pairing a dongle with a premium diagnostic app transforms a generic code into live sensor data. For UK drivers, our top picks are:

    • Torque Pro (Android): The undisputed king, offering customisable dashboards, CSV data logging, and plug-in support for under a fiver.
    • Car Scanner ELM OBD2 (iOS & Android): A cleaner interface with free access to manufacturer-specific enhanced codes and a straightforward graph view.
    • OBD Fusion (iOS): Excellent for BMW and VAG group diagnostics when you pay for the in-app enhanced package, giving dealer-level PIDs without a laptop.

    Both apps let us monitor short-term fuel trims and misfire counts per cylinder—critical data for spotting a clogged injector before it leaves us stranded. Watching live O2 sensor voltage graphs and misfire counters lets us narrow problems down to a specific failing injector or coil pack, allowing us to order the correct part immediately.

    Decoding the Jargon: P-Codes, U-Codes, and Manufacturer Specifics

    Pulling a code like P0302 feels like reading hieroglyphics, but the anatomy is logical. The first letter designates the system:

    • P – Powertrain: Engine, transmission, and emissions-related faults.
    • C – Chassis: ABS, traction control, and suspension electronics.
    • B – Body: Airbags, climate control, lighting, and comfort modules.
    • U – Network & Communication: Lost signals between modules on the CAN bus.

    A P0301 means the same misfire on a Vauxhall Corsa as on a Ford Fiesta. However, enhanced manufacturer-specific codes dig deeper into ABS, airbags, and transmission modules. A generic reader might miss an electronic parking brake fault on a modern BMW. We also learned the hard way that a dying 12V battery can trigger spurious U-codes for lost communication. Before chasing complex electrical gremlins, we always check the battery’s state of charge and alternator output. A full charge often makes a dashboard full of terror disappear instantly.

    From Code to Clarity: Our DIY Diagnostic Logic

    A code reader tells us where the problem is, not what it is. We treat a scan as the starting point, not the conclusion. If a P0204 injector circuit code appears, we grab a multimeter before buying parts. This physical cross-referencing separates proper auto repair from a parts cannon approach. When the scanner suggests a lean condition, we listen. True bad fuel injector symptoms often manifest audibly—a failing solenoid produces a sharp, metallic ticking distinct from normal direct injection clatter. Placing a hand on the injector body lets us feel rhythmic clicking, ruling out complete electrical failure. Combining a P0171 lean code with live fuel trim data helps us isolate whether the culprit is a vacuum leak, weak fuel pump, or failing injector.

    Clearing Codes and the Post-Repair Drive Cycle

    After replacing a faulty part, the temptation to press “Erase” and call it done is huge. But clearing codes also wipes MOT readiness monitors. Driving to the test centre with cleared monitors guarantees failure, as the system needs completed self-tests. We always clear codes with the ignition on and engine off to prevent voltage spikes. Then we let the car idle for ten minutes to allow throttle body recalibration. Setting the EVAP and catalyst monitors requires a strict drive cycle. We do a late-night run that reliably sets the monitors:

    1. Start from a cold engine – coolant temperature must be below 50°C.
    2. Accelerate gently to 55 mph on a dual carriageway, keeping throttle changes smooth.
    3. Hold 55 mph steadily for four minutes without touching the brake or clutch pedal.
    4. Coast down to 20 mph without using the brake, then gently accelerate back to 55 mph.
    5. Repeat the steady cruise and coast-down once more before returning home.

    This sequence completes the catalyst, oxygen sensor, and EVAP monitor self-tests, making the next MOT visit a formality.

    Empowering ourselves with a simple code reader has changed our relationship with car ownership. We can identify a loose petrol cap in seconds or spot early bad fuel injector symptoms long before they leave us stranded. However, a £15 dongle cannot replace a seasoned mechanic who hears a failing dual-mass flywheel from across the workshop. While we champion driveway diagnostics for transparency and cost-saving power, a trusted local independent garage remains the cornerstone of keeping any vehicle on the road.

    Frequently Asked Questions

    Will a cheap OBD-II scanner work on my diesel car?

    Yes, any diesel registered after 2004 will have a standard EOBD port readable by a generic ELM327 scanner. However, cheap clones may only read engine codes and won’t access manufacturer-specific DPF data needed for regeneration diagnostics.

    Can Halfords or Kwik Fit read codes for free?

    Some branches might offer free checks, but a full diagnostic scan usually incurs a labour fee. Phone your local branch to confirm, but generally they charge a diagnostic fee redeemable against repair work carried out by them.

    Is it safe to drive with a flashing check engine light?

    No. A steady light means diagnose soon, but a flashing light indicates a severe misfire actively damaging the catalytic converter. Pull over safely and call for recovery immediately to avoid a very expensive exhaust system failure.

    Why does my scanner not connect to the ECU?

    This is often a fuse problem. Check your vehicle’s fuse box for the CIG or 12V accessory fuse, as many manufacturers wire the OBD-II port on the same circuit as the cigarette lighter. A blown fuse from a faulty phone charger will cut power to the diagnostic port.

    Do I need a special app for my iPhone to use an ELM327?

    Yes, you must use a Wi-Fi version of the ELM327 dongle for iPhones, not Bluetooth. Apple’s iOS restricts the Bluetooth serial port protocol used by standard dongles. We recommend a Wi-Fi dongle paired with the Car Scanner ELM OBD2 app for the most stable connection.

  • Coolant types and why mixing matters

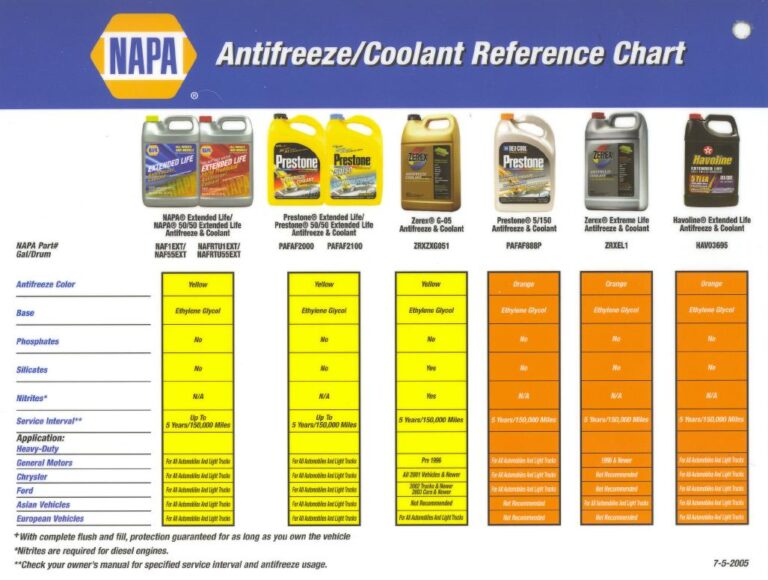
    Coolant Types and Why Mixing Them Is a Recipe for Disaster

    Last winter, a Vauxhall Astra rolled into our workshop with a cabin as cold as a December morning in Glasgow. The owner had topped up the expansion tank himself, grabbing whatever bottle was gathering dust on the garage shelf. We drained the system and found a mysterious jelly-like sludge completely blocking the thermostat housing. That gloopy, beige nightmare is what happens when incompatible coolants go to war inside your engine. It was a stark reminder that a simple top-up can quickly spiral into an expensive repair.

    The Chemistry Lesson: IAT, OAT, and HOAT Coolants

    Antifreeze isn’t just coloured water. It’s a carefully engineered cocktail of ethylene glycol and corrosion inhibitors. To understand why mixing them is catastrophic, you need to grasp the three main families living under your bonnet.

    Inorganic Additive Technology (IAT): The Old Guard

    This is the traditional stuff, usually identifiable by classic green or blue hues. IAT relies on silicates and phosphates to protect metal components. These additives work fast, forming a protective layer quickly, but they deplete rapidly. That’s why IAT coolants demand a strict flushing schedule every two years. You’ll typically find this in older UK classics, but it’s becoming rarer in modern vehicles due to its short lifespan.

    Organic Acid Technology (OAT): Long-Life Modern Magic

    Walk into a dealership for a modern Vauxhall, Jaguar, or Land Rover, and the system is likely filled with OAT. Unlike fast-acting IAT, OAT coolants use neutralised organic acids that provide slower, more targeted protection. The huge benefit is longevity; these are often marketed as “long-life” and can last five years or 100,000 miles. The chemistry is vastly different from the old green stuff, and the two do not play nicely together.

    Hybrid Organic Acid Technology (HOAT): The Best of Both Worlds

    HOAT sits neatly in the middle, combining the quick-acting protection of silicates with the long-life properties of organic acids. You’ll find specific HOAT variants in many Fords and Asian imports. It’s a fantastic compromise, but it adds another layer of complexity to the colour confusion because a HOAT coolant can look deceptively similar to an IAT or OAT fluid.

    The Colour Confusion: Why You Can’t Trust the Dye

    We’ve seen the aftermath of this mistake too many times. A home mechanic sees blue liquid and assumes it matches the blue liquid already in the reservoir. This is a dangerous trap. The automotive industry has never standardised coolant colours, meaning the dye is essentially a marketing afterthought or regional preference, not a chemical indicator.

    Green, Pink, Blue, or Yellow: What Do They Actually Mean?

    Historically, old-school Bluecol blue antifreeze was a reliable sign of IAT. However, we’ve recently worked on Japanese imports running modern HOAT coolants that also use a dark blue dye. Similarly, while pink usually suggests an OAT coolant in a Peugeot or Citroen, you can’t bank on that rule across all manufacturers. The only thing colour reliably tells you is that a dye was added, not which corrosion inhibitor package is inside the bottle.

    The Great Universal Coolant Myth

    You’ll see bottles on the shelves claiming to be “universal” and compatible with all colours. While some high-quality universal top-ups are chemically safe to mix with most OAT systems in an emergency, our team operates on a zero-trust policy. Pouring a universal coolant into an old IAT system often dilutes the silicate content to a point where corrosion protection is severely compromised. It’s a false economy that puts your water pump at risk.

    The Gunky Aftermath: What Happens When You Mix Them

    So, what actually happens inside the engine block when IAT and OAT clash? It’s not an explosion, but a silent chemical mutiny. The specific additives designed to protect different metals react with each other, neutralising the entire protective package.

    Silicate Drop-Out and Gel Formation

    The most visually dramatic failure is silicate drop-out. When you mix a high-silicate IAT with an OAT formula, the silicates can destabilise and precipitate out of the liquid. They form a thick, beige gel that looks disturbingly like soft toffee. This sludge migrates to the tightest hot spots. In UK cars like the Ford Focus and the notoriously sensitive early 2000s MINI Coopers, this gel immediately blocks the narrow passages of the heater matrix, leaving you with no cabin heat just as winter sets in.

    Water Pump Erosion and Cavitation Damage

    Beyond the gunk, the neutralisation of corrosion inhibitors leaves the coolant aggressively attacking metal. The water pump impeller, often made of fragile plastic composites in modern engines, becomes a primary victim. Cavitation—the implosion of tiny air bubbles against the metal surface—eats away at the pump blades. We’ve pulled out water pumps where the blades have been completely ground down to a smooth disc, all because the wrong coolant mix turned the fluid into a corrosive soup.

    Spotting the Signs: Bad Coolant Mix Symptoms

    A failing cooling system often presents symptoms that mimic other problems. We’ve had customers convinced they’re dealing with bad fuel injector symptoms because the engine runs rough on a cold morning. If coolant sludge has clogged the throttle body heater circuit, the intake air can fail to atomise fuel correctly, creating a shaky start that feels exactly like a fuelling fault.

    • Sludge in the expansion tank: Pop the cap when the engine is stone cold. If you see brownish sludge coating the cap or floating in the reservoir, or if the liquid looks like a murky milkshake rather than translucent fluid, you’ve got a chemical reaction happening. Don’t ignore this; it’s often misdiagnosed as a blown head gasket.
    • Overheating and erratic cabin heat: A thermostat jammed open by gel will cause the engine to run too cool, killing fuel economy. A thermostat jammed shut will cause rapid overheating. Cabin heat fluctuating wildly—blowing hot when accelerating, then cold at idle—is a textbook sign of a restricted heater core.
    • Unexplained coolant loss: If you’re constantly topping up without visible leaks, the contaminated coolant may be boiling off at lower temperatures due to compromised thermal properties.
    • Sweet, burnt smell: Leaking or boiling contaminated coolant produces a distinct acrid-sweet odour that’s noticeably different from normal hot antifreeze.

    The Autoknowit Flush Guide: A Clean Slate for Your Engine

    If you’ve inherited a car with a questionable service history or accidentally mixed types, don’t panic. Our team has perfected a method to purge the system completely and start fresh. It’s messy, but significantly cheaper than replacing a heater matrix.

    Choosing the Right Replacement Coolant

    Before you drain a drop, buy the right stuff. Skip the universal trap and go straight to a quality brand. For most modern VAG group cars or Vauxhalls running OAT, we consistently use Comma G30 or Mannol G12+, both readily available at UK retailers. Always double-check the specification against your owner’s manual—look for approvals like VW TL-774D or Ford WSS-M97B44-D, not just the colour.

    The Full Drain, Flush, and Fill Process

    Start by draining the old contaminated fluid via the bottom radiator hose. Re-fill the system with pure de-ionised water—never use tap water, especially in hard-water areas like London or Kent, as limescale buildup reduces thermal efficiency as badly as the sludge you’re trying to remove. Add a dedicated radiator flush chemical from brands like Prestone or Holts, run the engine up to temperature with the heaters on full blast, then drain it again. Repeat the de-ionised water rinse until the water runs clear, then fill up with your chosen concentrate and de-ionised water mix.

    Our Team’s Verdict: Stick to the Spec Sheet

    We’ve seen the chemical experiments gone wrong, and we’ve paid the price in ruined water pumps. Experimentation with coolant is foolish because the damage isn’t immediate—it’s a slow death that manifests months later. The correct Comma or Mannol formulas are so accessible in the UK that there’s simply no excuse for guessing. If the label on the aftermarket bottle looks even slightly confusing, buy the genuine pre-mixed concentrate from the dealership. Yes, it costs more, but it’s guaranteed to match the chemical makeup of what’s already in the block. This is especially vital for niche performance engines or modern Euro 6 diesels where cooling system tolerances are razor-thin.

    Ultimately, a bottle of the wrong coolant is a shocking false economy. The £15 you save by grabbing a random jug off the shelf can very quickly turn into a £600 bill for a new radiator or a four-figure nightmare to replace a buried heater matrix. Take five minutes today to pop your bonnet and visually inspect the expansion tank. If the liquid looks like a contaminated mess rather than crisp, clean fluid, it’s time to flush before the cold weather bites.

  • Buying used: a pre-purchase checklist

    Buying Used: A Pre-Purchase Checklist You Can Actually Trust

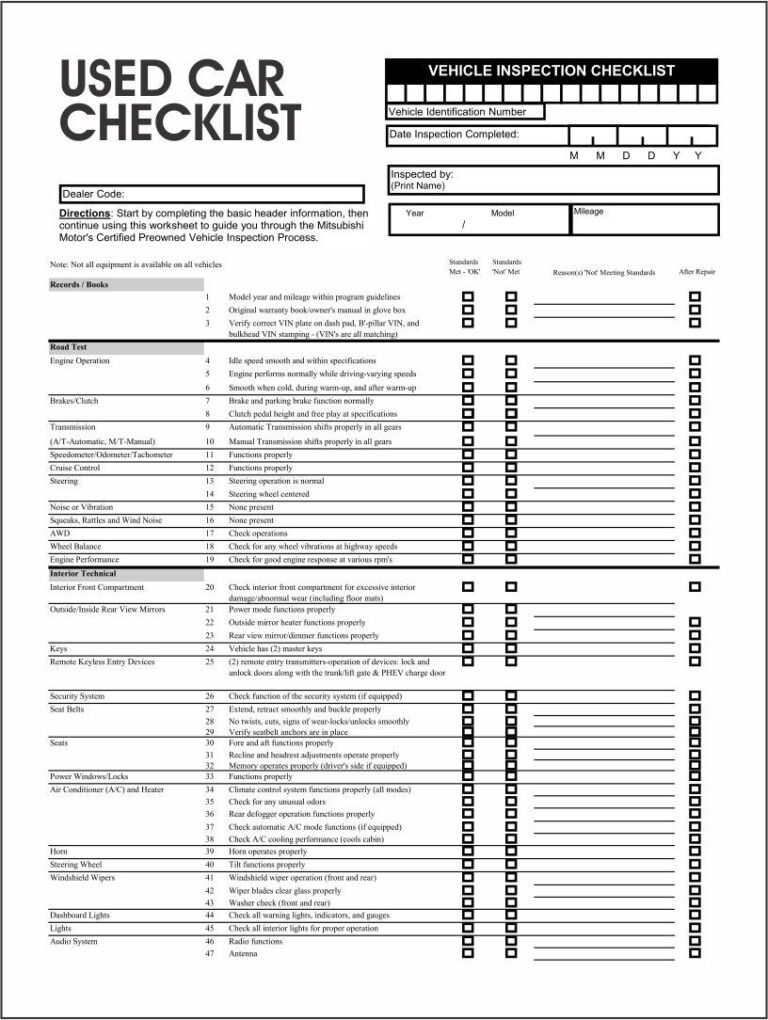
    Last month, our mate Dave rang us buzzing about a “bargain” three-year-old hatchback he’d just picked up from a private seller. The price was too good to be true, and he’d skipped the checks to avoid “insulting” the seller. Forty-eight hours later, the engine management light glared amber, the idle felt like a tractor, and a diagnostic scan revealed a failing high-pressure fuel pump and a cooked injector. The garage quoted him £1,800. Don’t be Dave. Our team has compiled the definitive pre-purchase checklist that balances mechanical scrutiny with the paperwork paranoia required on British soil. Here’s how we separate a diamond from a dud.

    Paperwork First: The V5C and History Check

    Before you even glance at the gleaming paintwork, demand to see the documents. We treat the paper trail as the gatekeeper. If the paperwork smells fishy, we walk—no exceptions. The V5C logbook is the cornerstone of any private sale, but it’s also one of the most misunderstood documents in the UK.

    You’re looking for the current red and blue V5C, issued since 2019, though older red versions are still legitimate. Hold the document up to a natural light source. A genuine V5C features a “DVL” watermark that is embedded into the paper, not printed flat on the surface. Run your thumb over the serial number on the front page; it should feel slightly raised. Crucially, remember that a V5C is a registration document, not proof of legal ownership. The registered keeper is not necessarily the legal owner, especially if the car is on finance. We always cross-reference the VIN etched on the chassis with the number printed on the logbook. If the seller makes excuses about the logbook being “lost in the post,” postpone the viewing until it arrives.

    A full history check is non-negotiable. We use providers like HPI Check or the DVLA’s own online service to uncover hidden horrors. The two biggest red flags are outstanding finance and write-off markers. If there’s a logbook loan or hire purchase agreement attached, the car technically belongs to the finance company, and they can repossess it from your driveway without a court order. You also need to understand the modern write-off categories:

    • Category S (Structural): The car has suffered structural damage to the frame or crumple zones. It might look straight now, but it’s been welded back together. Always get a professional engineering report before considering one.
    • Category N (Non-structural): The car has cosmetic or non-structural electrical damage. While Cat N can be a bargain, inspect the repair quality carefully.

    Cold Start Inspection: Listening for Bad Fuel Injector Symptoms

    This is our golden rule: turn up unannounced or insist the engine hasn’t been run that day. A warm engine hides a multitude of sins. We place our hand flat on the bonnet to verify it’s stone cold. A savvy seller might warm an engine to mask bad fuel injector symptoms that only manifest during a cold enrichment cycle. When you turn the key, listen for extended cranking—if the starter motor churns for more than a couple of seconds before the engine catches, you’re likely looking at a leaking injector bleeding pressure back into the tank overnight. Once it fires, a lumpy idle that shakes the cabin or a rhythmic misfire suggests a clogged or stuck-open injector. Stick your nose near the engine bay; a strong, raw petrol smell indicates a leaky seal or a cracked fuel line, a fire risk you don’t want.

    Sellers can be crafty with dashboard lights. We’ve seen black tape behind the instrument cluster lens and even removed bulbs. Turn the ignition to position two without starting the engine. The Engine Management Light (EML), ABS, airbag, and battery lights must illuminate in a “self-test.” If the EML stays dark, the bulb has been tampered with. A cheap OBD-II Bluetooth scanner, which we always carry, can reveal “pending” fault codes even if the light has been recently cleared. If the readiness monitors show “incomplete,” the seller has wiped the codes recently to hide a problem.

    On a cold start, a puff of steam is normal condensation. But hold a clean rag near the tailpipe and watch for these exhaust smoke colours:

    • Thick white smoke with a sweet smell: Coolant burning in the combustion chamber—a classic head gasket failure.
    • Blue-tinged smoke: Burning oil, usually worn valve stem seals or piston rings.
    • Black smoke: An overly rich fuel mixture, often linked to those bad fuel injector symptoms we mentioned earlier.

    Fluids and Filters: Predicting Future Auto Repair Bills

    Popping the bonnet isn’t just about looking mechanical; it’s about predicting your next auto repair invoice. We start with the oil filler cap. Unscrew it and look at the underside. A “mayonnaise-like” residue—a creamy, yellow-white sludge—indicates coolant mixing with oil. This is usually the death rattle of a blown head gasket, and the repair cost is often more than the car’s value on an older runabout. Don’t just check the cap; peer into the coolant expansion tank (only when cold!) with a torch. If you see an oily, iridescent rainbow slick floating on the pink or blue coolant, walk away.

    Pull the dipstick and wipe it on a white paper towel. The colour tells a story. Jet-black, gritty oil suggests neglect and skipped service intervals, which can sludge up the engine and starve the turbo of lubrication. Low oil on the stick is equally alarming; it means the engine is burning or leaking it rapidly. However, don’t be fooled by suspiciously clean, honey-coloured oil. Sellers often do a fresh oil change right before a sale to hide a failing engine that mixes oil and coolant slowly. This is why the filler cap check is so vital.

    Locate the brake fluid reservoir. Fresh fluid is a pale, golden straw colour. Dark brown or black fluid is hygroscopic—it has absorbed moisture from our damp British atmosphere. Moisture lowers the boiling point of the fluid. On a long downhill stretch or during an emergency stop, that water can boil into steam, leading to a sudden, terrifying loss of pedal pressure. If the fluid looks like old tea, budget for an immediate flush.

    Chassis and Tyres: Spotting UK Weather Damage

    We love a car with a full service history, but in the UK, the real killer is corrosion. Our damp climate, combined with the salt gritters that plaster our roads every winter, eats cars from the inside out. Get down on your hands and knees. Look at the sills (the metal below the doors). Prod the inner wheel arches and the boot floor with a gloved finger. Surface rust is manageable on a budget banger, but flaking, crusty metal that crumbles to the touch is an MOT failure waiting to happen. Check the metal brake lines running along the underbody; corroded lines are a common and dangerous fault.

    Tyres aren’t just rubber; they’re the only thing keeping you out of the hedge. Find the DOT code on the sidewall. The last four digits represent the week and year of manufacture (e.g., “3221” means the 32nd week of 2021). Tyres older than six years often suffer from dry rot and cracking, regardless of tread depth. The UK legal minimum tyre tread depth is 1.6mm across the central three-quarters of the tread, but we don’t settle for the legal limit. If the tyre is near that marker, factor in the cost of a new set immediately. Uneven wear across the shoulder suggests tracking issues; scalloped dips indicate worn shock absorbers.

    Bring a small fridge magnet wrapped in a microfibre cloth to protect the paint. Run it along the lower doors, rear arches, and around the fuel filler cap. If the magnet fails to stick or the magnetic pull suddenly weakens, you’ve found a thick layer of body filler covering up crash damage. A paint depth gauge is more scientific, but a magnet is a brilliant, low-tech lie detector.

    The Critical Test Drive: Beyond the Radio Volume

    Never let a seller dictate a route of smooth, quiet residential streets. We insist on a specific loop: a potholed B-road, a steep hill, and a stretch of dual carriageway. Turn the radio off and wind the windows down slightly. On a rough B-road, listen for clunks and knocks from the suspension bushes and drop links. On a steep hill, test the clutch bite point in second gear; if the revs flare but the speed doesn’t increase, the clutch is slipping. On the dual carriageway, check for steering wheel wobble at 60-70 mph, which points to unbalanced wheels or worn track rod ends.

    British roads are “crowned” (higher in the centre) for water drainage. This naturally causes a slight drift to the left. However, on a perfectly flat stretch, the car should track straight. Let go of the wheel briefly when it’s safe. If the car darts violently left or right, it’s not just alignment; it could be a bent steering arm from a hidden pothole impact. Check the steering wheel itself—is it perfectly straight when driving in a straight line? An off-centre wheel suggests a lazy tracking job or, worse, a repaired subframe.

    If you’re buying a modern diesel, the Diesel Particulate Filter (DPF) can be a financial time bomb. During the test drive, check the trip computer for the instant fuel consumption. If the mpg is stuck at a very low figure (e.g., sub-15 mpg) and the idle sits at 1,000 rpm instead of 800, the car is likely performing an active regeneration. An occasional regen is normal, but if the seller has just started the car and it’s immediately trying to regen, the DPF is likely clogged from years of short city trips. A blocked DPF can cost over £1,000 to replace, a serious auto repair that makes a “cheap diesel” very expensive.

    Before you even book a viewing, we always check the MOT history online via the official GOV.UK website. It’s free and takes two minutes. We look for mileage anomalies—a car that clocks 20,000 miles every year, then suddenly does 2,000 miles in a year, likely sat broken. Repeated failures for the same item (like corroded brake pipes) tell you the previous owner only fixed the bare minimum. If you lack mechanical confidence entirely, remember that the AA and RAC offer independent pre-purchase inspections. An engineer will put the car on a ramp and give you a report that pays for itself in negotiating power.

    Conclusion

    Buying a used car is a game of risk management. We’ve learned that the ability to walk away is your strongest negotiation tool. A bruised ego from missing out on a “bargain” heals a lot faster than a drained bank account from a catastrophic auto repair. Trust your gut. If the seller rushes you, the logbook looks dog-eared, or the engine sounds like a bag of spanners on a cold morning, there is always another car. Walking away from a bad deal saves more money than any successful haggling ever could.

    Frequently Asked Questions

    Is a V5C logbook proof that I own the car?

    No. A valid V5C logbook should have a DVL watermark and clearly states on the front that it is not proof of legal ownership. It simply registers the person responsible for taxing and registering the vehicle. You must check for outstanding finance separately.

    What is the legal minimum tyre tread depth in the UK?

    The UK legal minimum tyre tread depth is 1.6mm across the central three-quarters of the tread, around the entire circumference of the tyre. However, we strongly recommend replacing tyres at 3mm to maintain safe wet-weather braking distances.

    What does Category S write-off mean?

    Category S (Structural) and Category N (Non-structural) write-offs replaced the old Cat C and Cat D classifications. Cat S means the vehicle has suffered structural damage to the chassis or frame and has been professionally repaired, but you should always get an independent inspection before buying one.

    How can I check a car’s MOT history for free?

    You can check the MOT history online via the official GOV.UK website. You only need the vehicle registration number. This will show you every test result, the recorded mileage, and any reasons for failure going back years, helping you spot clocked vehicles or recurring faults.

    Should I get a professional inspection before buying?

    If you aren’t confident checking the mechanicals yourself, the AA and RAC offer independent pre-purchase inspections. They will send a qualified mechanic to inspect the car on a ramp, checking everything from compression to chassis legs, giving you a detailed report and peace of mind.

  • Brake pad wear: when to replace

    Brake Pad Wear: When to Replace – Our Team’s Straight-Talking Guide

    It always starts the same way. You’re crawling through the morning queue on the M62, foot hovering between accelerator and brake, when a faint, high-pitched squeal cuts through the radio. You turn the stereo down, listen again, and it’s gone. Dust on the discs, you tell yourself. Then it comes back the next day, a little sharper. That’s the moment every driver eventually faces—the nagging doubt about safety. Our team has spent enough weekends on axle stands in draughty garages to know exactly how that feels, and we’re here to cut through the noise with a straight-talking guide to knowing when your brake pads are done.

    How Brake Pads Work and Why They Wear Down

    A brake pad is a block of high-friction material bonded to a rigid steel backing plate. When you press the middle pedal, hydraulic pressure forces the pad against the spinning brake disc, converting kinetic energy into heat. Every time you slow for a roundabout, you’re asking a small piece of composite material to turn motion into thermal energy without falling apart. Even the best pads—our team has run everything from EBC Ultimax on a family estate to Brembo OE on a hot hatch—are consumables by design. They sacrifice themselves millimetre by millimetre so your discs and calipers don’t have to.

    On a typical UK commute, brake pads face unique punishment. Stop-start traffic on A-roads, repeated downhill braking into towns, and gritted winter surfaces that coat everything in abrasive slurry all accelerate wear. A set of front pads might last 30,000 to 50,000 miles under normal conditions, but we’ve seen them worn to the backing plate in under 15,000 on cars doing short urban trips. If one side wears faster than the other, you’re likely looking at a sticking caliper guide pin—a common issue on cars exposed to UK winter road salt.

    The Telltale Signs Your Brake Pads Need Replacing

    Brakes are communicative. Long before they fail outright, they’ll give you warnings that something isn’t right. The trick is knowing which signals mean “check soon” and which mean “stop driving now.” Our team has learned to read these signs the hard way, often while diagnosing seemingly unrelated problems.

    That high-pitched squeal at low speeds is almost certainly the wear indicator touching the disc. It’s designed to be annoying—a persistent acoustic reminder that pad thickness is approaching the minimum. Ignore it long enough, and the sound changes. A deep, metallic grinding noise means the friction material is gone entirely, and the steel backing plate is now carving grooves into your brake disc. At this stage, you’re no longer just replacing pads; you’re paying for new discs too. We’ve seen bills triple because a driver pushed through the noise for another fortnight.

    Many modern cars feature electronic wear sensors embedded in the pad material. When the pad wears thin enough, the sensor circuit breaks and triggers a dashboard warning light—usually a circle with dashed lines around it. Unlike the acoustic wear indicator, which can be intermittent when it first engages, the electronic sensor is a one-way trip. Once that light comes on, replacement is urgent.

    How to Check Brake Pad Thickness Yourself

    You don’t need a ramp or a mechanic’s qualification to assess your brake pads. With a decent torch and ten minutes of patience, you can get a reliable reading through the wheel spokes on most cars. For a more thorough inspection, removing the wheel gives you direct line of sight to both inner and outer pads—and we recommend doing this at least twice a year, ideally when you swap between summer and winter tyres. The inner pad often wears faster than the outer one, so a visual check through the wheel alone can miss critical wear.

    Our team keeps a simple brake pad gauge in the top drawer of the toolbox. It slots over the pad material and gives an instant readout in millimetres—green for safe, amber for advisory, red for replace now. A good LED pen torch is essential for working in the dim light of a typical British garage. If you’re removing wheels, a torque wrench for refitting is non-negotiable; we’ve seen too many warped discs from over-tightened wheel bolts.

    Factory-fitted wear indicators are either mechanical clips or electronic sensors. The mechanical type is foolproof: a small metal tab bends toward the disc as the pad wears, and when it makes contact, you hear it. Aftermarket pads sometimes omit this feature, so don’t assume silence means safety. The UK legal minimum is 1.5mm of friction material, but our team strongly recommends replacement at 3mm. Below that, heat dissipation suffers and stopping distances increase.

    MOT Rules and UK Legal Requirements for Brake Pads

    The MOT test treats brakes as a primary safety system, and the DVSA standards are uncompromising. Pads must have at least 1.5mm of friction material remaining, but that’s a bare minimum for a pass—not a recommendation for safe driving. The tester will also assess braking efficiency on a roller brake tester, measuring the deceleration force generated at each wheel and checking for imbalance across the axle. A car that passes on pad thickness alone can still fail if the braking force is uneven.

    During the test, the examiner visually inspects the pads through the wheel spokes. They’re checking for contamination, cracking, and thickness, but they’re also looking at the bigger picture. A sticking caliper, indicated by one pad worn significantly more than its partner, will earn a fail or at least an advisory. The roller brake test measures individual wheel braking force and compares left-to-right balance. Anything outside the DVSA tolerance triggers further investigation.

    Beyond the safety risk, driving with pads below the legal limit carries real-world penalties. If you’re stopped by police and your brakes are found defective, you could face a £100 fixed penalty notice and three points on your licence. In the event of a collision, insurance assessors will inspect the brake system, and worn pads can shift liability onto you, even if the accident wasn’t primarily your fault.

    Choosing the Right Replacement Pads for Your Car

    Walk into any motor factor in the UK and you’ll be offered a bewildering range of pad compounds, brands, and price points. The right choice depends on how you use your car, not just what fits the caliper. Our team has tested enough combinations to know that matching the pad to the driver’s real-world needs matters more than chasing the highest specification.

    Here are the main pad types and where they shine:

    • Ceramic pads: Low dust, quiet operation, and consistent performance across a wide temperature range. Ideal for premium saloons and SUVs that see mostly urban and motorway miles.
    • Semi-metallic pads: Higher metal content means harder bite and better heat handling. Suits spirited driving and heavier vehicles, though they produce more visible wheel dust.
    • Organic pads: Made from fibres and fillers bonded with resin. Gentler on discs and cheaper upfront, but wear faster and fade sooner under hard use.

    For everyday hatchbacks and family cars, Pagid pads offer consistent OEM-level performance at a sensible price. If you enjoy a brisk cross-country run, Ferodo DS Performance pads deliver sharper initial bite without the squeal that plagues full-track compounds. Brembo OE pads are our go-to for European performance models. EBC Ultimax pads have proven themselves on heavier vehicles where low dust and long life matter more than outright friction coefficient. Whatever brand you choose, buy from a reputable supplier—counterfeit pads are a growing problem in the UK market.

    Step-by-Step: Replacing Brake Pads at Home

    Replacing brake pads is a satisfying DIY job that saves serious money over garage rates. The process is mechanically straightforward on most cars, but the stakes are high—get it wrong and you’re compromising the one system that stands between you and the car in front. Our team has done this job more times than we can count, and we’ve distilled the essentials into a method that prioritises safety without overcomplicating things.

    Here’s the core process we follow:

    1. Park on level ground, chock the rear wheels, and loosen the wheel bolts before jacking the car. Use proper axle stands—never rely on a jack alone.
    2. Remove the caliper guide bolts and swing the caliper away from the disc, supporting it with a bungee cord so it doesn’t hang by the brake hose.
    3. Retract the caliper piston fully using a wind-back tool or G-clamp, and clean all contact surfaces with a wire brush.
    4. Apply a thin smear of copper grease to the pad ears and backing plate edges—this prevents the squeal that drives owners mad and stops corrosion seizing the pads in the carrier.
    5. Fit the new pads, reassemble the caliper, and torque everything to the manufacturer’s specification.

    Fresh pads need a deliberate bedding-in procedure to transfer an even layer of friction material onto the disc surface. Skip this step and you risk glazing the pads, reducing their effectiveness permanently. For the first 200 miles, avoid heavy braking from high speed. Instead, perform a series of moderate decelerations—40mph down to 20mph, repeated eight to ten times with cooling gaps in between. You’ll notice the pedal feel improve and the initial bite sharpen as the miles accumulate.

    Frequently Asked Questions

    How often should I check my brake pad thickness?

    We recommend a visual inspection every 6,000 miles or at least twice a year—ideally when you swap between summer and winter tyres. Inner pads can wear faster than outer ones, so a wheel-off check gives the most reliable reading.

    Can I replace just the front or rear pads?

    Front and rear pads wear at different rates, with fronts typically wearing twice as fast. It’s perfectly acceptable to replace just one axle, provided the other still has adequate thickness. Always replace pads in axle pairs—never fit a single pad on one side.

    What’s the difference between cheap pads and premium brands?

    Premium pads like Ferodo, Brembo, and EBC use higher-grade friction materials, more consistent manufacturing processes, and better-quality backing plates with anti-corrosion coatings. Cheap pads often lack wear indicators, generate more dust, and can fade unpredictably under hard braking.

    Do I need to replace brake discs when I replace the pads?

    Not always, but discs should be measured for thickness and checked for scoring or warping. If the disc is below its minimum thickness specification, heavily grooved, or has a pronounced lip at the edge, replacement is essential. Fitting new pads to worn discs compromises braking performance and shortens pad life.

    Will worn brake pads cause my MOT to fail?

    Yes. Pads below 1.5mm of friction material are an automatic fail. Uneven pad wear that causes a braking imbalance across the axle will also fail, as will pads contaminated with brake fluid or grease. Even if the pads pass on thickness, the overall braking efficiency test must meet DVSA minimums.

  • Battery testing at home

    How We Test a Car Battery at Home Without Fancy Garage Gear

    There’s a particular sinking feeling we’ve all experienced on a frosty British morning. You shuffle out to the car, scrape the ice off the windscreen, slide into the driver’s seat, and twist the key—only to be greeted by a sluggish, groaning crank that sounds like a wounded animal. It’s a noise that instantly turns your stomach, especially when you’re already running late. Our team has been caught out by this scenario more times than we’d care to admit, which is precisely why we stopped relying on guesswork and started demystifying battery health with nothing more than a simple multimeter and a few logical steps. You don’t need a workshop full of diagnostic gear to know whether your battery is on its last legs; you just need to know what to look for and how to interpret the numbers.

    Why We Rely on Regular Home Battery Checks

    We’ve learned the hard way that waiting for a total failure is a miserable strategy. The UK presents a uniquely hostile environment for automotive batteries. Our damp, dreary winters place enormous strain on electrical systems, while the reality of modern driving habits quietly finishes the job. Many of us commute short distances, and the average car journey in the UK clocks in at just 8.4 miles. That’s barely enough time for the alternator to replenish the charge used during starting, meaning your battery is slowly dying a death by a thousand short trips. We see this degradation accelerated in vehicles fitted with Yuasa’s silver calcium range, which remains the factory fit for countless Japanese models from Honda to Mazda. These batteries are robust, but they require a higher charging voltage, and a tired alternator combined with a 10-minute school run is a recipe for a flat battery.

    The Cost of a Preventable Breakdown on the M25

    Let’s talk about the real-world consequences of ignoring your battery’s health. A breakdown on a smart motorway like the M25 isn’t just an inconvenience; it’s a genuinely dangerous and expensive ordeal. Recovery fees, missed appointments, and the sheer stress of sitting in a dead car while lorries thunder past can be avoided with a monthly check. The cost of a basic multimeter is a fraction of what you’ll pay for an emergency call-out, not to mention the inflated price of a replacement battery bought in a panic from a motorway services recovery truck.

    How Seasonal Temperature Swings Affect Your Cold Cranking Amps (CCA)

    We often hear people say their battery “just died overnight” when the temperature plummets. What actually happens is a chemical slowdown. A battery’s Cold Cranking Amps rating tells you how much current it can deliver for 30 seconds at -18°C. As the mercury drops, the chemical reaction inside the battery slows, and the available cranking power drops with it. An ageing battery that coped fine during a mild autumn will expose its weakness the moment a sharp frost hits, leaving you stranded precisely when you need the car most.

    The Essential Safety Kit We Use Before Touching Terminals

    Before we pop the bonnet, we always grab our safety gear. Batteries are grumpy things filled with sulphuric acid, and even modern “maintenance-free” units like the Bosch S5 or Varta Silver Dynamic are not risk-free. A stray spark, a cracked case, or a clumsy move can turn a simple check into a trip to A&E. We never lean over a battery without protecting ourselves first.

    Ventilating Your Garage or Driveway Properly

    If you’re working in a garage, we insist on opening the door fully before you start. A charging or heavily discharged battery can vent explosive hydrogen gas. Even if you’re just testing, it’s a good habit to ensure a stiff breeze can flow through the space. We prefer working outdoors on a driveway whenever possible, simply to eliminate the risk of gas accumulation.

    Why We Disconnect the Negative Terminal First

    This is a non-negotiable rule in our workshop. We always disconnect the negative (black) terminal first. The logic is simple: if you’re wrenching on the positive terminal and your spanner accidentally touches any bare metal on the chassis, you’ve created a dead short. By removing the negative connection first, you break the circuit and eliminate the risk of welding your spanner to the bodywork. When reconnecting, the negative goes on last.

    Our Step-by-Step Static Voltage Test Using a Multimeter

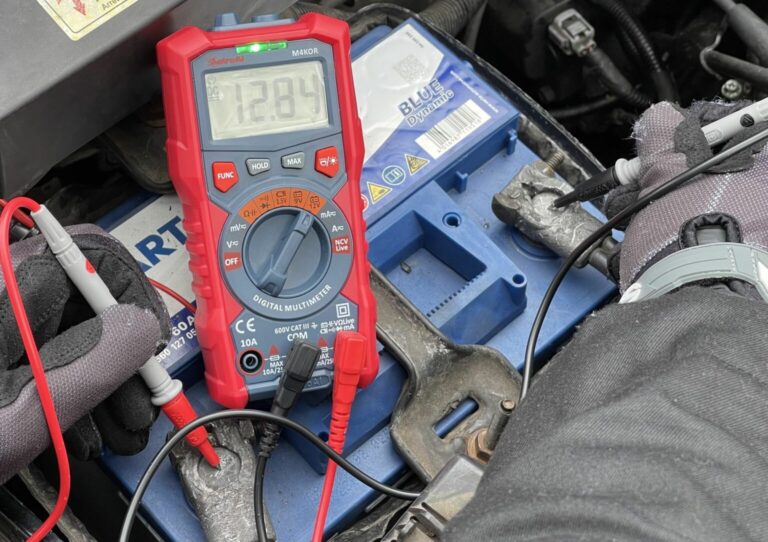
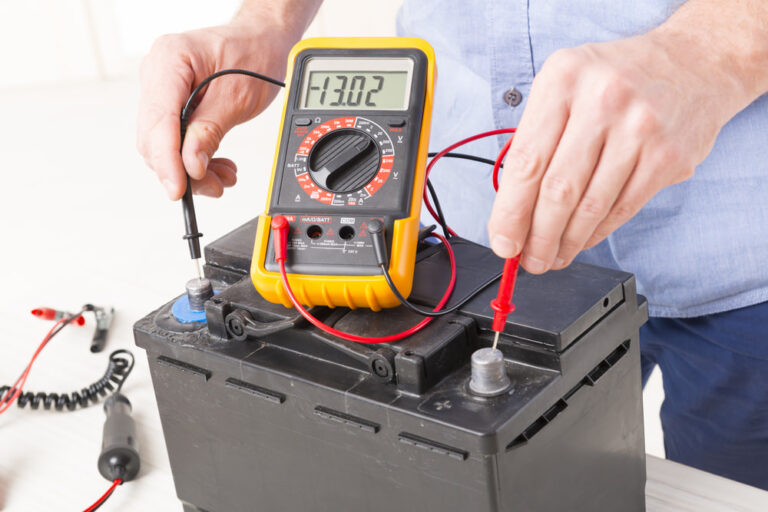
    This is the foundation of our home diagnostics. We grab a digital multimeter; the Draper 60792 is our go-to for reliability, but the Halfords Advanced multimeter is a perfectly solid budget pick that lives in many of our team members’ gloveboxes. We set the dial to 20V DC and make sure the car has been sitting for at least a few hours, preferably overnight. A surface charge from a recent drive will give you a falsely optimistic reading, and we want the truth, not a comforting lie.

    Reading Surface Charge vs. True State of Charge

    If you’ve just parked up, the alternator has been pumping voltage into the battery, and the reading will be artificially high. To get the true resting voltage, we either wait several hours or switch the headlights on for 30 seconds to bleed off the surface charge. Once the lights are off and the battery settles, we take our measurement. A healthy, fully charged 12V battery should sit at 12.6V or above. Anything less tells us the battery is either undercharged or losing its capacity.

    What 12.2V Tells Us About Battery Health

    We see 12.2V far too often on cars that “seem fine.” The reality is stark: 12.2V represents a state of charge of roughly 50%. If your battery is sitting at this level regularly, sulphation is hardening on the lead plates, permanently reducing its ability to hold a charge. It might still start the car on a warm afternoon, but we know it’s a ticking time bomb for the next cold snap.

    Simulating a Cranking Load Test Without a Dedicated Tester

    A static voltage reading can be deceptive. We’ve seen batteries hold 12.7V beautifully but collapse the moment a load is applied. To simulate a proper load test, we need to prevent the engine from actually firing while we crank it. This lets us watch the voltage behaviour under maximum strain without needing an expensive carbon pile tester.

    Locating the Fuel Pump Relay on Common UK Models

    Our preferred method is disabling the fuel pump. On a Vauxhall Corsa, the relay is typically in the engine bay fuse box, clearly labelled on the lid. A Ford Focus usually hides it in the passenger footwell fusebox. We simply pull the correct relay or fuse, which stops fuel delivery and prevents the engine from starting. Always check your owner’s manual for the exact location before yanking fuses randomly.

    Interpreting Voltage Drop on a Vauxhall Insignia vs. Ford Fiesta

    With the fuel delivery disabled, we connect the multimeter and have a colleague crank the engine for a solid 10 seconds. We watch the display like a hawk. On a Vauxhall Insignia with its larger diesel engine, the starter draws significant current, but the voltage must not drop below 9.6V at room temperature. A smaller Ford Fiesta with a petrol engine is equally unforgiving; if we see it dipping to 9.0V or lower, that battery is failing the test regardless of what the static voltage claimed. A sluggish crank combined with a deep voltage sag tells us the internal resistance is too high.

    Spotting the Physical Signs of a Dying Battery

    Sometimes we don’t even need a multimeter to know things have gone wrong. A visual inspection often reveals a battery crying out for retirement. We’ve lifted many bonnets on older cars running classic Lucas units and been met with a scene of chemical carnage that explains the electrical gremlins instantly.

    Cleaning Terminals with a Wire Brush and Baking Soda Solution

    White, crystallised corrosion around the posts is a common sight, but it’s not just cosmetic. That blueish-white fuzz creates resistance, preventing the starter from drawing the current it needs. We mix a tablespoon of baking soda with a cup of water and scrub the terminals with an old toothbrush. The alkaline solution neutralises the acidic corrosion. Once clean, a smear of petroleum jelly helps prevent it from returning.

    Inspecting the Alternator Charge Rate as a Root Cause

    A bulging battery case or a distinct rotten-egg smell is a red flag we never ignore. This usually indicates the battery has been overcharging, boiling the electrolyte dry, and internally shorting. However, the battery isn’t always the culprit here. We always check the alternator’s output afterwards. With the engine running, we expect to see between 13.8V and 14.4V at the terminals. If we see 15V or higher, the voltage regulator is fried, and it will cook a brand-new battery just as quickly as it destroyed the old one.

    When Our Team Decides It’s Time to Visit a Specialist

    We’re big advocates for DIY, but we also know where its limits lie. Occasionally, a battery passes our home voltage and cranking tests but still leaves us stranded in the morning. This points to a subtle internal fault, often a dead cell or high internal resistance that only appears under specific thermal conditions. That’s when we swallow our pride and seek out a professional conductance test.

    Free Drop-In Testing Services Available on the High Street

    We’re fortunate in the UK that major retailers offer free battery health checks with no obligation. Euro Car Parts and Halfords both provide walk-in testing services that take minutes. Their equipment doesn’t just measure voltage; it sends a frequency signal through the battery to analyse the condition of the plates. It’s a deeper level of insight that a basic multimeter simply cannot provide, and it’s often the final word when we’re scratching our heads.

    Understanding the Printout from a Midtronics or Foxwell Tester

    When the specialist hooks up a Midtronics or Foxwell tester, they’ll hand you a printout. We look for three key metrics: the measured CCA versus the rated CCA, the state of health, and the internal resistance. If the measured CCA has fallen significantly below the rating printed on the label—say a 650 CCA battery testing at 400 CCA—the printout will usually flash a blunt “Replace Battery” recommendation. We trust that verdict.

    Integrating a quick monthly voltage check into our standard maintenance routine has saved us from the unique misery of standing in a Tesco car park, staring at a silent dashboard while the rain lashes down. It’s a five-minute task that transforms a mysterious black box into a predictable component. By keeping an eye on that resting voltage, cleaning the terminals, and understanding how our short British commutes affect charging, we’ve managed to replace batteries on our own terms, rather than waiting for them to fail on a dark, wet Tuesday evening.

    Frequently Asked Questions

    How often should we check our car battery at home?

    We recommend a quick voltage check at least once a month, especially during winter. It’s also wise to test it before a long journey or after the car has been sitting unused for a week.

    Can a car battery be too dead to jump-start?

    Yes. If the voltage has dropped below roughly 10.5V, a cell may have shorted internally. While you can sometimes jump-start a deeply discharged but healthy battery, a unit with a dead cell won’t hold a charge and could be dangerous to boost.

    Is it safe to test a sealed maintenance-free battery ourselves?

    Absolutely. While brands like Yuasa and Varta dominate the aftermarket as sealed OEM suppliers, they still contain acid. As long as you wear nitrile gloves and glasses, and avoid creating sparks, testing a sealed unit is perfectly safe.

    What does it mean if the battery reads 12.6V but the car won’t start?

    This is a classic sign of a bad connection or a failing starter motor. The battery has the energy stored, but it isn’t reaching the starter. Check for loose or corroded terminals and ensure the ground strap to the engine block is secure.